
Before anything else: if you suspect a drive has failed, open a case with Nutanix Support straight away. Don’t pull a disk on your own judgement. Support will confirm the drive has genuinely failed rather than been marked offline for another reason, identify the correct physical slot, dispatch the replacement, and — importantly — check the cluster with you afterwards to confirm the new drive has been properly absorbed. Pulling the wrong disk from a node that has already lost one is how a routine hardware swap turns into a data-availability incident.
What follows is the verification discipline I apply around that process. It isn’t a substitute for the Support case; it’s what makes sure the replacement genuinely finished rather than merely appearing to.
How the failure shows up
The platform usually tells you before anyone notices a performance problem. A failing or dropped drive typically produces a run of alerts in quick succession — metadata disk not mounted, disk marked offline, and, if the drive was one of the CVM’s own boot SSDs, a critical Boot RAID Volumes degraded alert:
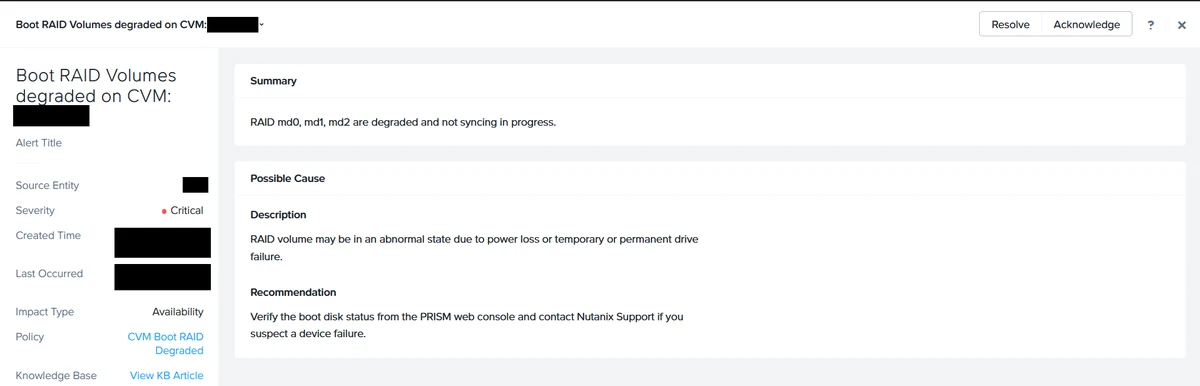
Read the summary carefully: RAID md0, md1, md2 are degraded and not syncing in progress. All three arrays at once is the signature of losing one of the two SSDs that carry the CVM’s own operating environment. On these nodes those two drives are partitioned to do double duty — three small partitions mirrored across both disks for the CVM’s root, boot and /home, plus a large fourth partition on each that serves as cluster storage.
That’s why this alert outranks a plain “disk offline”. Cluster data redundancy is handled by the distributed storage fabric across nodes, and it protects itself. The CVM’s local boot mirror is a two-disk RAID 1 with no such luxury: one disk gone means zero remaining redundancy for the CVM itself until the mirror is rebuilt.
Confirming the picture before the swap
From the CVM, check what the OS can actually see:
nutanix@CVM$ list_disks

Slot  Disk      Model                       Serial           Size
1     /dev/sda  SAMSUNG MZXXXXXXXXXX-00005  S456NYXXXXXXXX   3.84 TB
2     /dev/sdb  SAMSUNG MZXXXXXXXXXX-00005  S456NCXXXXXXXX   3.84 TB
3     /dev/sdc  HGST HUS000X8XXXX       VGGXXXXX         8.00 TB
4     /dev/sdd  HGST HUS000X8XXXX       VGGXXXXX         8.00 TB
5     /dev/sdf  HGST HUS000X8XXXX       VGGXXXXX         8.00 TB
6     /dev/sde  HGST HUS000X8XXXX       VGGXXXXX         8.00 TB
A hybrid node like this one has two SATA SSDs and four 8 TB HDDs. Then check the mounts:
nutanix@CVM$ df -h

/dev/md0        9.8G  5.6G  4.1G  59%  /
/dev/md2         40G   25G   15G  64%  /home
/dev/sda4       3.4T  1.8T  1.6T  53%  /home/nutanix/data/stargate-storage/disks/S456NYXXXXXXXX
/dev/sdb4       3.4T  1.7G  3.4T   1%  /home/nutanix/data/stargate-storage/disks/S456NCXXXXXXXX
A slot missing from list_disks, or a mount point that has gone unresponsive, confirms what the alerts are saying. Note the asymmetry in the last two lines above — that’s the post-replacement state, and I’ll come back to it.
Watching the platform adopt the new drive
Once the drive is physically in, the interesting question is whether the automation picked it up properly. Hades — the hardware management service — logs the whole sequence, and grepping for the new drive’s serial gives you the story end to end:
nutanix@CVM$ grep S456NCXXXXXXXX ~/data/logs/hades.outTrimmed to the lines that matter:
INFO  disk_manager.py  Handling hot-plug event for disk /dev/sdb, short serial: S456NCXXXXXXXX
ERROR spdk_util.py     Could not find disk with serial 'S456NCXXXXXXXX' in the Hades proto
INFO  disk_manager.py  Mounting partition /dev/sdb4 on path .../disks/S456NCXXXXXXXX
INFO  disk_manager.py  Disk /dev/sdb with serial S456NCXXXXXXXX is stargate usable
INFO  disk_manager.py  Running add disk pre-checks for disk S456NCXXXXXXXX
INFO  disk_manager.py  Add disk pre-checks passed for the disk S456NCXXXXXXXX
INFO  disk_manager.py  Adding new disk {'disk_id': <id>, 'storage_tier': 'SSD-SATA', ...} to zeus
INFO  disk_manager.py  Choosing S456NCXXXXXXXX for oplog
INFO  notify.py        notification=PhysicalDiskAdd disk_serial=S456NCXXXXXXXX disk_location=2
                       action=No Action required. Disk added to data path
INFO  disk_manager.py  Disk /dev/sdb with serial S456NCXXXXXXXX is successfully added to cluster
Two things are worth understanding here rather than just scanning for green.
The ERROR lines near the top look alarming and are entirely normal. The system is checking whether it already knows this serial, and it doesn’t — because the drive is new. Those errors are the expected result of a successful first sighting. People see them, assume something went wrong, and open an unnecessary case.
The line that actually matters is the last one: successfully added to cluster. Until that appears, the disk exists physically but is doing nothing for the cluster. Choosing ... for oplog just before it confirms the new SSD has also been taken into the write-ahead log rotation, which is what you want on an SSD in a hybrid node.
Confirming the drive itself is healthy
A drive can mount cleanly and still be bad. Dead-on-arrival units are rarer than they used to be but they still happen, and you do not want to discover it later. Pull a full SMART report:
nutanix@CVM$ sudo smartctl -x /dev/sdb -T permissiveYou don’t need to read all of it. Five things are worth checking every single time:
SMART overall-health self-assessment test result: PASSED

ID# ATTRIBUTE_NAME             RAW_VALUE
  5 Reallocated_Sector_Ct      0
  9 Power_On_Hours             1
 12 Power_Cycle_Count          9
197 Current_Pending_Sector     0
199 CRC_Error_Count            0

Current Temperature:                    29 Celsius
Specified Max Operating Temperature:    70 Celsius
Under/Over Temperature Limit Count:     0/0
Percentage Used Endurance Indicator: 0- Reallocated_Sector_Ct and Current_Pending_Sector at 0. Anything above zero on a brand-new drive makes it a return, not a deployment.
- Power_On_Hours and Power_Cycle_Count in single digits. One hour and nine power cycles is a drive fresh out of its packaging. This is also your proof that you’re reading the new disk and haven’t fat-fingered the device node — if this shows thousands of hours, you’re looking at the wrong drive.
- Percentage Used Endurance Indicator at 0 on an SSD. No write life consumed.
- Temperature well under the specified maximum, with no under/over temperature events logged.
- Overall health PASSED, unambiguously.
Together those give you evidence the drive is fit for service, rather than an assumption based on the fact that it powered on.
Watching the RAID rebuild — all of it
If the replaced drive was one of the CVM’s boot SSDs, this is the step that actually restores redundancy, and it’s the one most likely to be cut short. Check the software RAID state:
nutanix@CVM$ cat /proc/mdstat

md0 : active raid1 sdb1[3] sda1[2]
      10475520 blocks super 1.1 [2/2] [UU]

md1 : active raid1 sdb2[3] sda2[2]
      10475520 blocks super 1.1 [2/2] [UU]

md2 : active raid1 sdb3[3] sda3[2]
      41908224 blocks super 1.1 [2/1] [U_]
      [========>............]  recovery = 43.7% (18336064/41908224) finish=1.9min speed=200813K/sec
The bracketed pair is the tell. [2/2] [UU] means both mirror members are present and in sync. [2/1] [U_] means only one of the two is up — the underscore is the member still catching up.
Notice that in the output above, md0 and md1 have already finished while md2 is still at 43.7%. That’s expected: md0 and md1 are 10 GB each and resync in seconds, while md2 is the 40 GB /home array and takes a few minutes. It’s also exactly the trap — glance at the top of the output, see two healthy arrays, and walk away while the node is still degraded. Check all three.
Watch it to completion with watch -d cat /proc/mdstat, and don’t stop until every array reads clean with no recovery line at all:
md0 : active raid1 sdb1[3] sda1[2]
      10475520 blocks super 1.1 [2/2] [UU]

md1 : active raid1 sdb2[3] sda2[2]
      10475520 blocks super 1.1 [2/2] [UU]

md2 : active raid1 sdb3[3] sda3[2]
      41908224 blocks super 1.1 [2/2] [UU]
That is the point at which the CVM has its redundancy back. The Prism alert may well have cleared before this — which is precisely why the alert clearing is not your finish line.
The final pass
One last lsblk confirms the new disk’s partitions landed in the arrays and mount points you expect, with nothing half-configured:
nutanix@CVM$ lsblk

sdb       3.5T  disk
├─sdb1     10G  part
│ └─md0    10G  raid1  /
├─sdb2     10G  part
│ └─md1    10G  raid1
├─sdb3     40G  part
│ └─md2    40G  raid1  /home
└─sdb4    3.4T  part          /home/nutanix/data/stargate-storage/disks/S456NCXXXXXXXX
Three partitions in the three mirrors, and the fourth mounted as cluster storage — matching its peer drive exactly.
Now back to that asymmetry in the earlier df -h. The new drive’s data partition showed 1.7 GB used of 3.4 TB, while its peer sat at 1.8 TB. That’s not a fault — it’s an empty disk that has just joined the cluster. The storage fabric will rebalance data onto it over the following hours. Worth knowing so you don’t chase it as a problem, and worth checking again the next day to confirm it is in fact filling up. A new disk that stays empty is telling you something.